5 errors upgrading to Exchange 2010 SP3 and how to fix them
5 errors upgrading to Exchange 2010 SP3 and how to fix them
Recently, I was upgrading an Exchange 2010 environment to Service Pack 3. I ran into a slew of different errors.
Five in fact.
Every time I fixed one, another pesky one cropped up.
Very frustrating!
Lots of research and troubleshooting later I was able to get it going. With Service Pack 2 going end of life back on April 8th I wanted to pass that knowledge on.
This article offers a comprehensive guide to the errors I received and how to fix them.
Tip: For a step-by-step guide on how a service pack should behave check out this article.
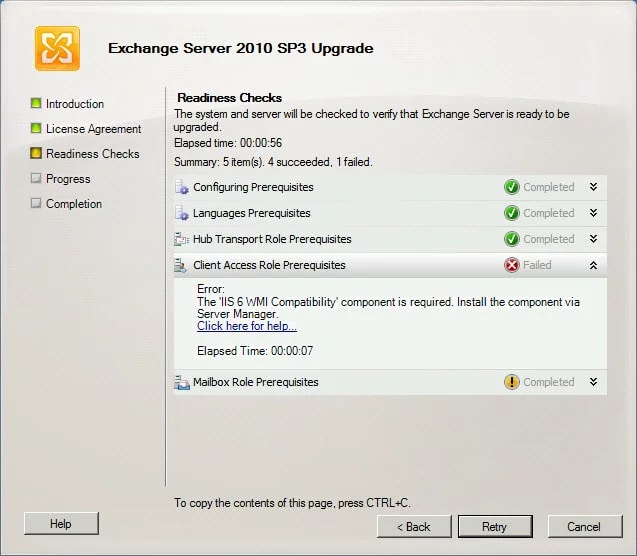
Readiness Check Fails – IIS 6 WMI Compatibility
This is the first error I received. It was during the readiness check. Thankfully it is very easy to fix.

To fix:
- Open Server Manager.
- Select Roles.
- Scroll down to the Web Services (IIS) section and click the Add Roles Services link.

- Click Next.

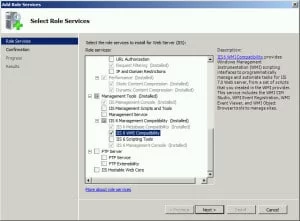
- Scroll down to Management Tools >> IIS 6 Management Compatibility section.
- Select IIS 6 WMI Compatibility.
- Click Next.

- Click Install.

- Click Close.
At this point, I was able to proceed past the readiness checks. Unfortunately, that was not the end of the problems for me.
The following roles aren’t current: AdminToolsRole
Strangely, all of these remaining errors revolved around the Mailbox role. My CAS and HUB transport roles installed without a hitch. The next error is below.
This server role can't be installed because the following roles aren't current: AdminToolsRole

This server role can't be installed because the following roles aren't current: MailboxRole
It seems strange to get this error about not being current. Especially when that is the very thing we are trying to do.
It is also possible to get this error on the ClientAccessRole and HubTransportRole as well. The fix is the same.
Thankfully, this fix was easy and I have to give kudos to Erdal Ozkaya for writing about this on his blog.
To fix we need to go into the registry.
- Open the Registry Editor.
- Navigate to HKLM\SOFTWARE\Microsoft\ExchangeServer\v14\AdminTools
- Make sure the ConfiguredVersion matches the UnpackedVersion.
( In my case the unpacked version number was correct for SP3. My configured version reported SP1. )

- If you have String Keys for Action and Watermark, right click on these and select Delete.

- Click Yes to confirm.
- Repeat steps 3 and 4 for these registry keys:
HKLM\SOFTWARE\Microsoft\ExchangeServer\v14\ClientAccessRole
HKLM\SOFTWARE\Microsoft\ExchangeServer\v14\HubTransportRole
HKLM\SOFTWARE\Microsoft\ExchangeServer\v14\MailboxRole - Reboot your server.
- Rerun SETUP.
All clear?
Sadly, I wasn’t.
Mailbox Role Failed: Cannot bind argument to parameter ‘Identity’ because it is null.
If you had the last error then chances are you have this one too.
Mailbox Role
Failed
Error:
The following error was generated when "$error.Clear();
if ($RoleCreatePublicFolderDatabase)
{
$publicDB = get-PublicFolderDatabase -Server:$RoleFqdnOrName -ErrorAction SilentlyContinue;
$DB = get-MailboxDatabase -Server:$RoleFqdnOrName -ErrorAction SilentlyContinue;
...edited for length...
}
" was run: "Cannot bind argument to parameter 'Identity' because it is null.".
Cannot bind argument to parameter 'Identity' because it is null.
The fix is a continuation of what we did in the Registry for the last error.
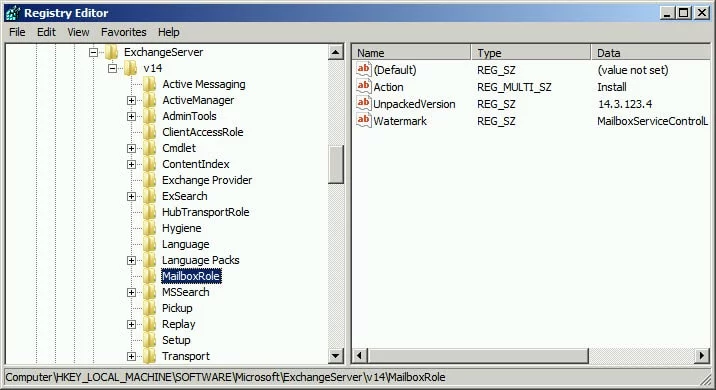
You may notice from my last screenshot, my MailboxRole was missing a ConfiguredVersion key. That’s our problem.

To fix:
- Open Registry Editor.
- Navigate to HKLM\SOFTWARE\Microsoft\ExchangeServer\v14\MailboxRole.
- Right-click in the right pane and select New >> String Value from the context menu.

- Type ConfiguredVersion for the name.
- Double-click ConfiguredVersion and set the value to match the UnpackedVersion.
( In my case this is 14.3.123.4. )

- If you have String Keys for Action and Watermark, right-click on these and select Delete.

- Reboot your server.
- Rerun SETUP.
Just when I thought I might be out of the woods -ERRR! New error.
Virtual Directory ‘PowerShell’ Already Exists
Error:
 The following error was generated when "$error.Clear();
 $vdirName = "PowerShell (Default Web Site)";
 $proxyVdirName = "PowerShell-Proxy (Default Web Site)";
 $InternalPowerShellUrl="http://" + $RoleFqdnOrName + "/powershell";
 $vdir = get-PowerShellVirtualDirectory -server $RoleFqdnOrName -DomainController $RoleDomainController | where { $_.Name -eq $vdirName };
 $proxyVdir = get-PowerShellVirtualDirectory -server $RoleFqdnOrName -DomainController $RoleDomainController | where { $_.Name -eq $proxyVdirName };
...edited for length...
The virtual directory 'PowerShell' already exists under 'EXCHANGE.SKARO.LOCAL/Default Web Site'.
 Parameter name: VirtualDirectoryName
For some reason, it didn’t like the existence of the PowerShell and PowerShell-Proxy Virtual Directories in IIS. The fix was simple. Delete those virtual directories. It’s ok. Setup will recreate them for us.
Here is how:
- Open IIS Manager.
- Expand your server name.
- Expand Sites.
- Expand the Default Web Site.
- Right-click the PowerShell virtual directory and select Remove from the context menu.

- Click Yes to confirm

- Repeat steps 5 and 6 for the PowerShell-Proxy virtual directory.
- Next open ADSI Edit.
- Right-click on the top-level node, ADSI Edit, and select Connect To...

- From the Select a well-known naming context drop-down select Configuration.

- Expand Configuration <server name>
- Expand CN=Configuration <domain suffix>
- Expand CN=Services
- Expand CN=Microsoft Exchange
- Expand CN=<domain name>
- Expand CN=Administrative Groups
- Expand CN=Exchange Administrative Group (FYDIBOHF23SPDLT)
- Expand CN=Servers
- Expand CN=<server name>
- Expand CN=Protocols
- Select CN=HTTP
- In the right pane select CN=PowerShell-Proxy (Default Web Site) and select Delete from the context menu.

- Click Yes to confirm.

- Repeat steps 22 and 23 for CN=PowerShell (Default Web Site).
- Reboot your server.
- Rerun SETUP.
That’s got to be the end of it right?
Sadly, no.
Couldn’t resolve the user or group Discovery Management
This is a problem with the Discovery Search Mailbox. For whatever reason the error below reports that it can not find it.
The following error was generated when "$error.Clear();
           $name = [Microsoft.Exchange.Management.RecipientTasks.EnableMailbox]::
DiscoveryMailboxUniqueName;
           $dispname = [Microsoft.Exchange.Management.RecipientTasks.EnableMailbox]::
DiscoveryMailboxDisplayName;
           $dismbx = get-mailbox -Filter {name -eq $name} -IgnoreDefaultScope -resultSize 1;
           if( $dismbx -ne $null)
           {
           ...edited for length...
           }
         " was run: "Couldn't resolve the user or group "SKARO.LOCAL/Microsoft Exchange Security Groups/Discovery Management." If the user or group is a foreign forest principal, you must have either a two-way trust or an outgoing trust.".
Couldn't resolve the user or group "SKARO.LOCAL/Microsoft Exchange Security Groups/Discovery Management." If the user or group is a foreign forest principal, you must have either a two-way trust or an outgoing trust.
The trust relationship between the primary domain and the trusted domain failed.
Now, some blogs say to simply disable this Discovery Search Mailbox.
Here is the command. Run from EMS.
C:\> Disable-Mailbox -Identity "DiscoverySearchMailbox{D919BA05-46A6-415f-80AD-7E09334BB852}"
Unfortunately, I had to take it one step further. Disabling the mailbox alone was not enough. I then had to go into Active Directory Users and Computers and delete the user account as well.

Once removed I was then able to get through the entire SETUP.
No more errors! Woot!
However, we do need to recreate the Discovery Search Mailbox. This is actually a simple process.
Open a command prompt. Change to the folder where you unpacked SETUP and run the following command.
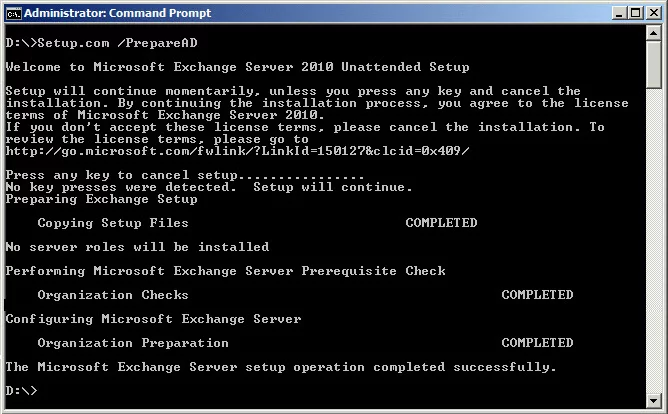
C:\> SETUP /PrepareAD
Successful output will look like this.

We still need to enable the Discovery mailbox. Issue the following command from EMS.
C:\> Enable-Mailbox -Identity "DiscoverySearchMailbox {D919BA05-46A6-415f-80AD-7E09334BB852}" -Discovery
To make sure this worked run this command.
C:\> Get-Mailbox -Filter { RecipientTypeDetails -eq "DiscoveryMailbox" }
You should get an output similar to the following.
We are done!
Scooby Mystery: One thing I noticed on the original Discovery account was the lack of a space between Mailbox and the opening curly bracket. PrepareAD recreated the account with a space. Have you guys seen this?
More How to Articles


I got this website from my pal who shared with me and now this time I am reading very informative articles or reviews at this time.